DIY Plant Self-Watering Devices: Keep Your Plants Alive While You’re Away
For gardening enthusiasts, maintaining healthy, thriving plants is a top priority. However, busy schedules or planned vacations often make it challenging to keep up with frequent watering. DIY plant self-watering devices offer a convenient and practical solution. These systems not only free up your time from daily watering chores but also provide a consistent and reliable water supply, crucial for plant health, especially in hot or dry environments. Many DIY methods also encourage the use of recycled materials, aligning with eco-friendly gardening practices.
Benefits of DIY Automatic Plant Watering
Creating your own automatic watering system for plants offers several advantages:
- Convenience: Eliminate the need for daily manual watering, saving you time and effort.
- Consistent Hydration: Provide plants with a steady and reliable water supply, promoting healthy growth.
- Vacation Plant Care: Ensure your plants stay well-hydrated while you are traveling.
- Water Conservation: Many methods deliver water directly to the roots, reducing water waste.
- Eco-Friendly Upcycling: Utilize recycled household materials for a sustainable gardening approach.
Easy DIY Plant Self-Watering Device Methods
Here are several simple and effective DIY methods to create your own plant self-watering systems:
1. Inverted Plastic Bottle Drip System (Quickest & Simplest)
This is one of the easiest and fastest DIY methods, ideal for individual potted plants and short trips.
Materials You’ll Need:
- Plastic bottle (empty water bottle, soda bottle – choose size based on pot size and watering duration)
- Awl, nail, skewer, or thumbtack (for creating holes)
- Water
Instructions:
- Puncture Holes in the Bottle Cap: Use your awl, nail, or similar tool to poke several small holes in the plastic bottle cap. Start with a few small holes; you can add more if needed. The size and number of holes control the drip rate – smaller holes mean a slower drip.
- Fill the Bottle with Water: Fill the plastic bottle completely with water.
- Secure the Cap: Tightly screw the cap with the holes back onto the water-filled bottle.
- Invert the Bottle Rapidly: Quickly turn the bottle upside down, holding your finger over the cap opening initially to prevent water from gushing out.
- Insert Bottle Neck into Soil: Make a hole in the potted plant’s soil near the edge of the pot, avoiding the plant’s main stem. Quickly push the bottle neck, cap-first, deep into the soil, burying it up to the bottle’s shoulder. Ensure the holes in the cap are fully buried in the soil.
- Monitor Drip Rate: Water should slowly drip into the soil as it dries. If dripping too quickly, the holes might be too large or numerous. If dripping too slowly, enlarge or add more holes. Aim for a slow, consistent drip.
2. String or Wick Watering System (Consistent Water Supply)
String or wick watering provides a more consistent and controlled water supply for your plants.
Materials You’ll Need:
- Water Reservoir: Jar, bowl, bucket, or any container to hold water. Choose a size appropriate for your plant and watering duration.
- Wicking Material:
- Cotton rope or thick cotton string (untreated, plain cotton is best)
- Strips of felt or cotton fabric (recycled t-shirts, towels cut into strips)
- Commercial wicking cord (available at garden stores or online)
- Potted Plant(s)
Instructions:
- Cut the Wick: Cut a length of wicking material long enough to reach from the bottom of your water reservoir to the middle of the soil in your plant pot, with some extra length.
- Fill the Water Reservoir: Fill your chosen reservoir container with water.
- Saturate the Wick: Thoroughly wet the wicking material with water to initiate capillary action.
- Insert Wick End into Soil: Use your finger or a stick to create a hole in the center of the potted plant’s soil, about 3-5 inches deep. Bury one end of the saturated wick into this hole, ensuring good contact with the soil.
- Place Other Wick End in Reservoir: Place the other end of the wick into your water reservoir, ensuring it reaches the bottom and is submerged. You may need to weigh it down with a small stone.
- Position Reservoir: Place the water reservoir next to or slightly below the plant pot.
3. DIY Converted Self-Watering Pot (Closer to Commercial Systems)
This method adapts an existing pot to function like a self-watering planter by creating a bottom water reservoir.
Materials You’ll Need:
- Potted Plant (in its original pot)
- Larger Outer Container: A waterproof pot, bucket, tub, or plastic storage bin, larger and deeper than the plant pot.
- Gravel, Pebbles, or Bricks (for platform inside reservoir): To elevate the plant pot base above the water level.
- Wick (optional, but enhances water uptake): Cotton rope, felt strips (same as method 2).
- Water
Instructions:
- Prepare Outer Container (Reservoir): If using a pot without bottom drainage holes, it’s ready. If it has drainage holes, line the inside bottom with a waterproof plastic liner to create a reservoir. For buckets or bins, ensure they are waterproof.
- Create Platform in Reservoir: Place a layer of gravel, pebbles, or bricks at the bottom of the outer container to elevate the plant pot.
- Add Water to Reservoir: Pour water into the outer container, filling to a level just below the platform top.
- Place Plant Pot in Outer Container: Carefully place your potted plant on the platform inside the outer container, ensuring the base is above the water level.
- Add Wicks (Optional, Recommended): For better wicking, use 2-3 wicks per plant pot. Wet wicks, insert one end through the drainage holes of the plant pot to contact the soil, and let the other ends dangle into the water reservoir.
- Initial Top Watering (Important): After setup, water the plant thoroughly from the top until water drains into the reservoir below.
4. Terracotta Cone/Spike Waterer (Porous Clay Slow Release)
Terracotta cones or spikes slowly release water into the soil through porous clay when inserted into a pot and filled with water. You can DIY a version with unglazed terracotta pots.
Materials You’ll Need:
- Small Unglazed Terracotta Pot (small size for easier insertion). Or use commercial terracotta watering spikes/cones.
- Cork or Stopper (to plug the drainage hole of the terracotta pot, if present).
- Potted Plant(s)
- Water
Instructions:
- Plug Drainage Hole (If Any): If the terracotta pot has a drainage hole, seal it tightly from the inside with a cork, stopper, or waterproof sealant to make it watertight.
- Fill Terracotta Pot with Water: Fill the small terracotta pot completely with water.
- Invert and Bury: Carefully invert the water-filled terracotta pot and quickly bury the wider, open rim deeply into the soil of your plant pot. Bury most of the terracotta pot, leaving only the plugged base slightly above the soil surface. The porous terracotta will slowly release water into the soil.
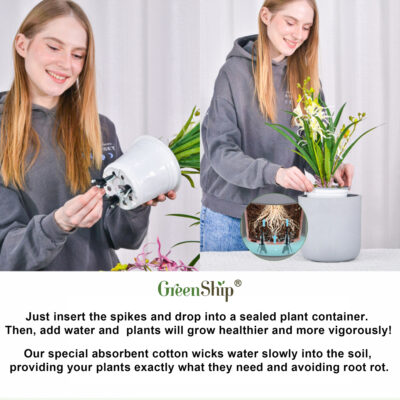
Introducing GreenShip Self-Watering Spikes: A Convenient Solution
For those seeking a more convenient and professional option, consider GreenShip 4 Pack Self-Watering Spikes. These patented self-watering spikes are designed as a DIY self-watering system specifically for grower pots and nursery pots, making them ideal for busy gardening enthusiasts.
GreenShip Self-Watering Spikes Features:
- Self-Watering Design: Eliminates frequent watering, maintaining moist soil for healthy plant growth.
- Wide Application Range: Suitable for various grower pots and nursery pots.
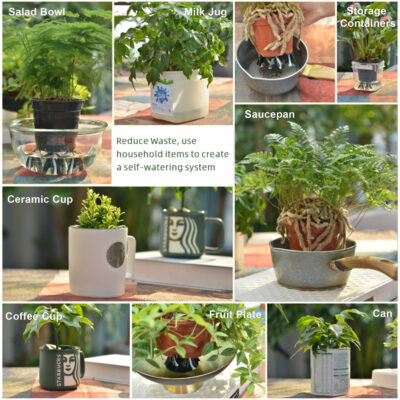
- Upcycling Capability: Transform household waste into eco-friendly self-watering systems by repurposing items like plates, jars, bowls, and disposable takeout containers as water reservoirs when used with GreenShip Self-Watering Spikes.
- Easy DIY Installation: Simply insert into the soil and connect to your chosen water source for automatic watering.
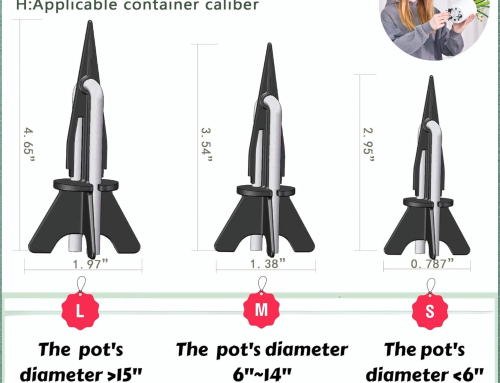
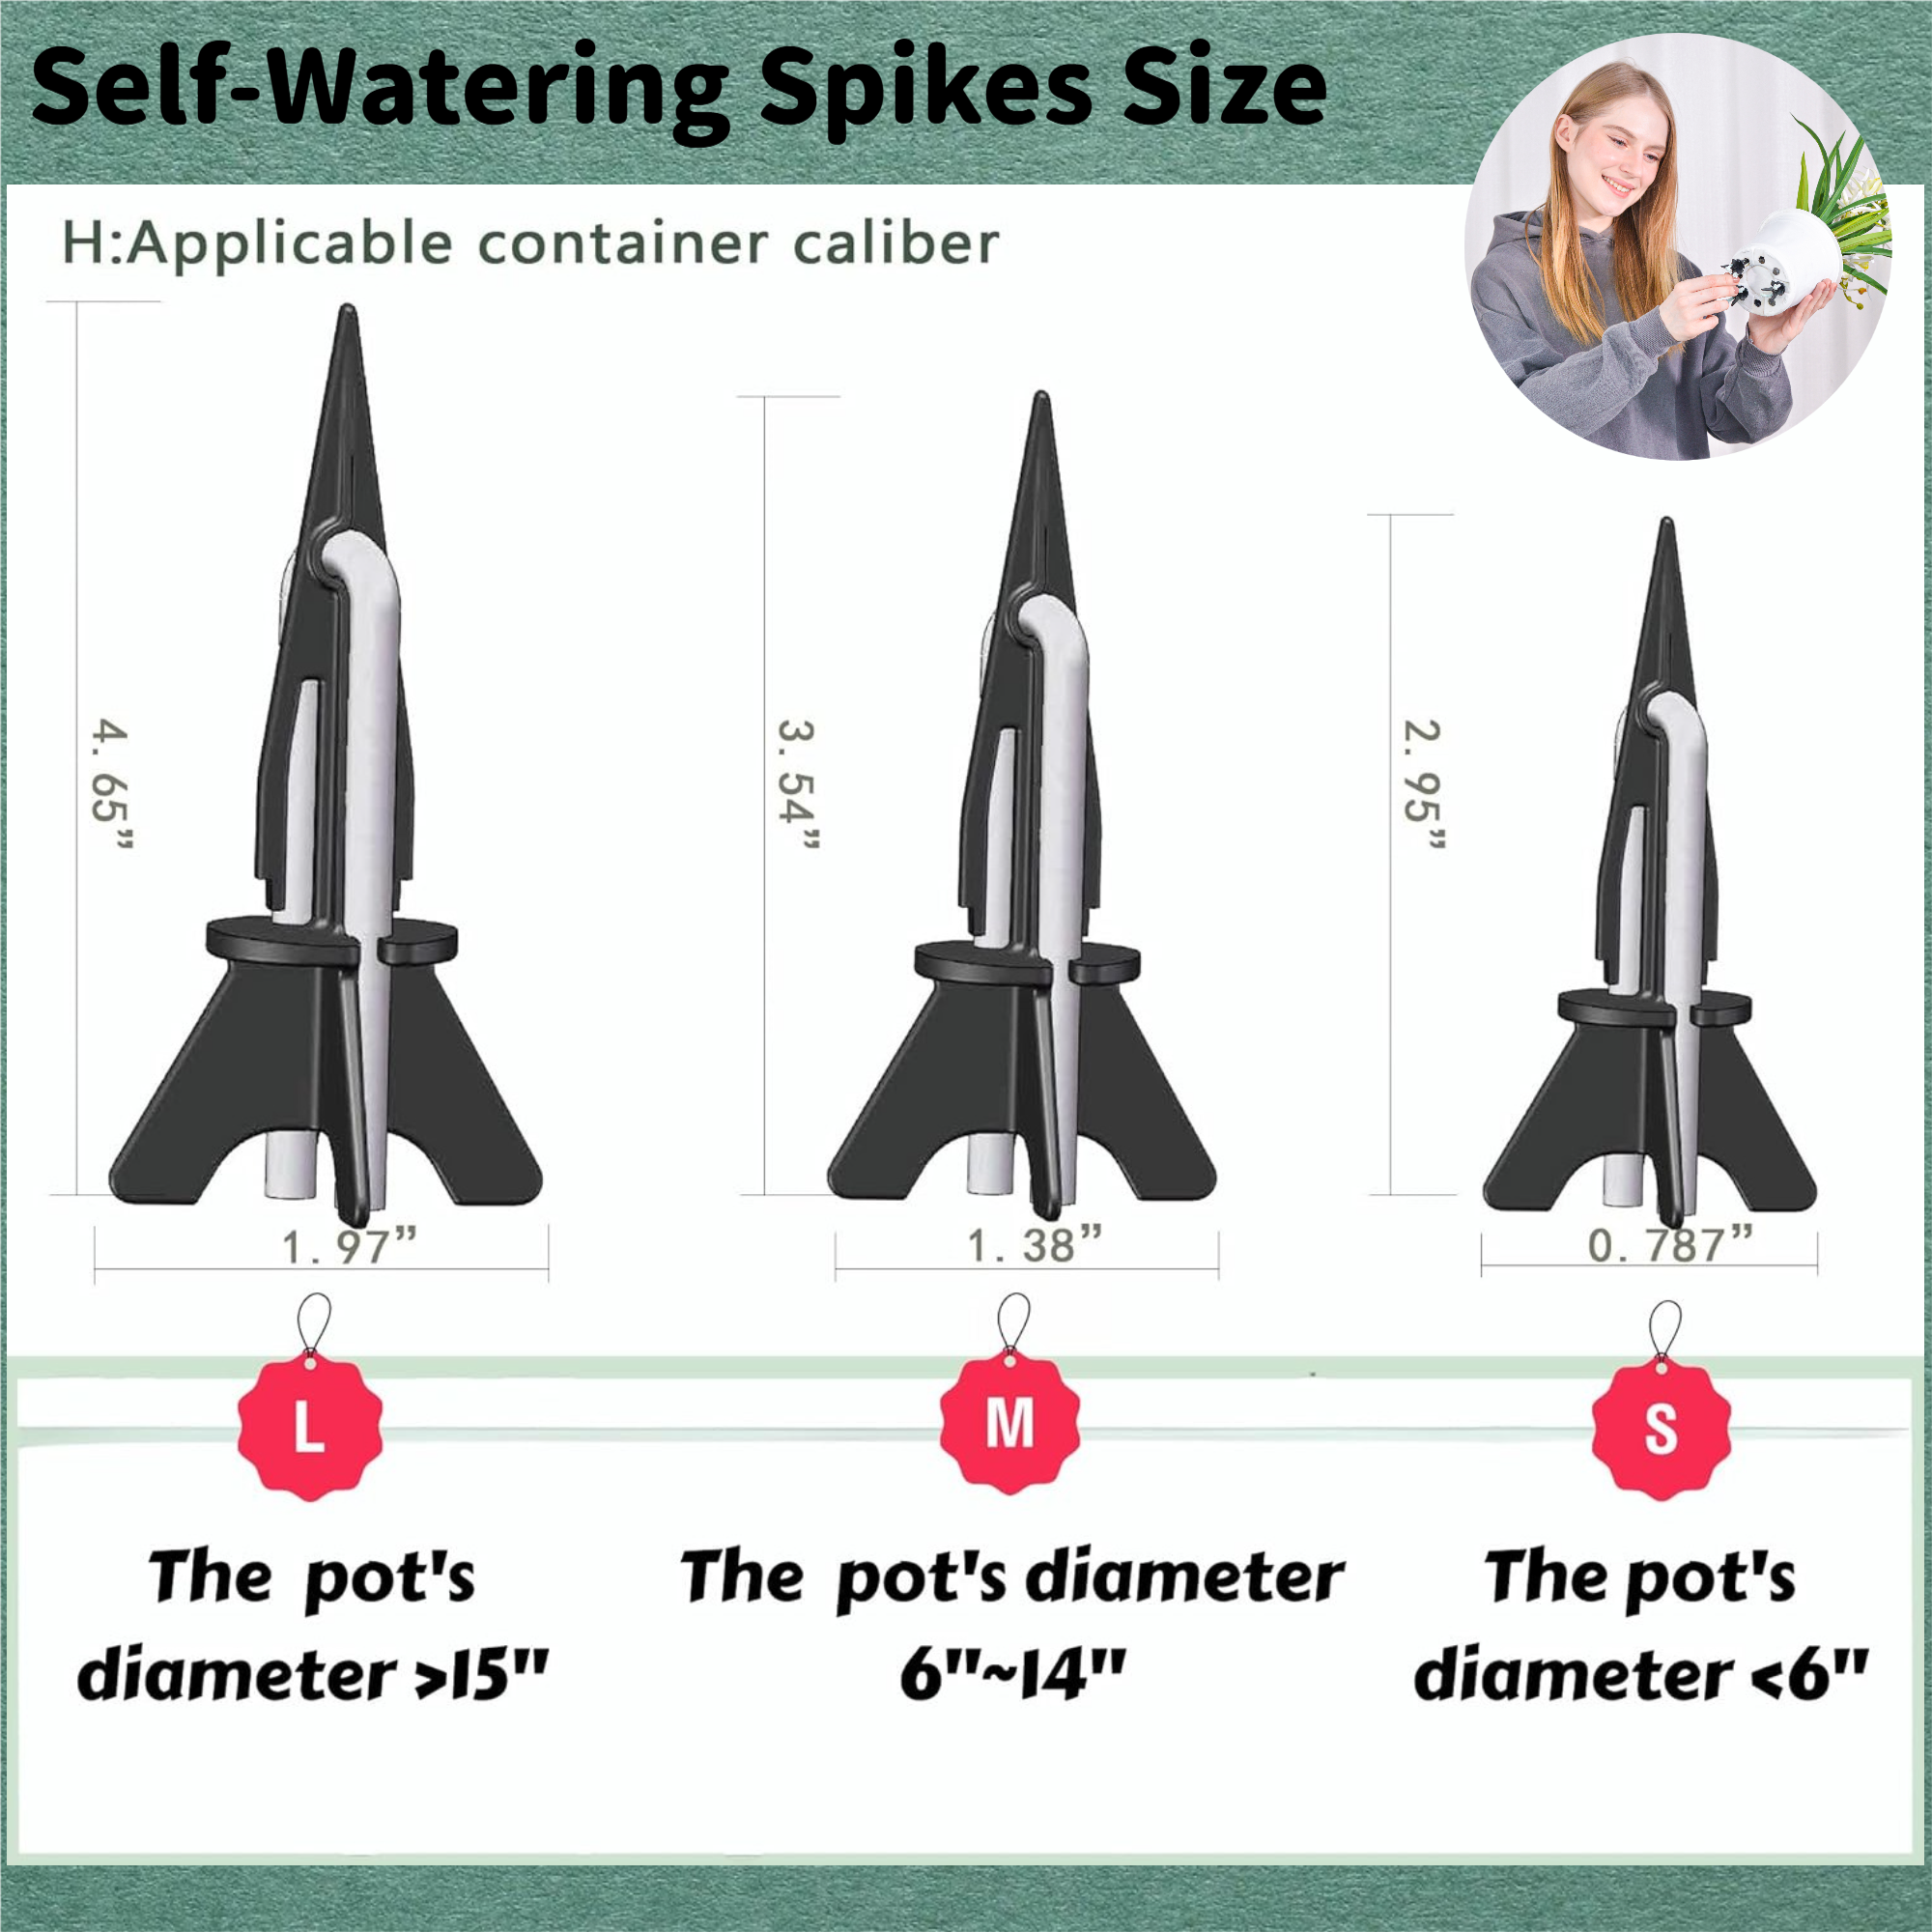
GreenShip Self-Watering Spikes Specifications:
- Size: Available in 3 sizes:
- Small (for pots up to 8 inches)
- Medium (for pots up to 11 inches)
- Large (for pots 12 inches and over)
Whether you’re a home gardener interested in upcycling or a professional grower seeking sustainable solutions, GreenShip Self-Watering Spikes are an excellent eco-friendly gardening tool to help your plants thrive and simplify plant care.
How to Use GreenShip Self-Watering Spikes:
- Select the Right Size: Choose the appropriate GreenShip Self-Watering Spike size based on your pot dimensions (Small, Medium, or Large).
- Insert Spike into Soil: Gently insert the pointed end of the GreenShip Self-Watering Spike deeply and firmly into the soil of your potted plant.
- Connect Water Source: Attach a water-filled container (your upcycled jar, bottle, etc.) to the top opening of the spike.
- Fill Water Reservoir: Fill your chosen container with water and invert it, fitting the opening snugly into the spike’s top.
- Monitor and Refill: Regularly check the water level in your reservoir and refill as needed.
Upcycled Reservoir Ideas for GreenShip Spikes:
- Plastic Bottles: Soda and water bottles of various sizes.
- Glass Jars & Bottles: Mason jars, food jars, glass bottles.
- Plastic Bowls & Plates: Shallow bowls or dishes (may require creative attachment).
- Disposable Takeout Containers: Clean plastic takeout containers with lids.
General Tips for Self-Watering Devices:
- Test First: Always test any DIY or commercial self-watering system before relying on it, especially before vacations.
- Plant Compatibility: Self-watering is generally best for plants that prefer consistent moisture.
- Soil Drainage: Use well-draining potting mix to prevent waterlogging.
- Proper Placement: Insert spikes and wicks firmly and deeply into the soil.
- Regular Monitoring: Check water reservoir levels and plant health regularly.
Conclusion
Whether you opt for cost-effective DIY methods or the convenience of GreenShip Self-Watering Spikes, creating a self-watering system for your plants is a smart way to ensure they receive consistent hydration, even when you’re busy or traveling. Choose the method that best suits your needs and enjoy the benefits of healthy, thriving plants with minimal effort!
About the Author — Greenship Garden Team
Greenship Garden is a U.S.-based brand dedicated to modern planter design and home gardening inspiration.
Our editorial team combines years of experience in plant care, garden styling, and sustainable living to help plant lovers create their perfect green spaces.
Through this blog, we share practical gardening tips, planter styling guides, and insights on how to choose the right pots for every home.
🌿 Written and reviewed by the Greenship Garden Team.