One Tablet and Any Cutting Can Root From Top to Bottom! It’s This Simple!
Propagating new plants from cuttings is an exciting and rewarding process for any gardener. However, ensuring successful root development requires the right techniques. In this guide, I’ll show you a simple yet effective method for rooting just about any cutting, including how to prepare the ideal rooting medium, handle the cutting correctly, and use an inexpensive pharmacy tablet to speed up root formation.
For this demonstration, the Spanish article uses leaf cuttings from African Violets (Saintpaulia) and Alocasia, both of which propagate readily from leaves. However, without understanding a few key techniques, this process can take much longer than necessary or even fail. By following this method, you can achieve faster and more reliable rooting results for a wide variety of plants.
Choosing the Right Cutting for Propagation Success
The success of propagation largely depends on selecting healthy cuttings. Here’s what to look for:
✔️ The mother plant must be healthy and free from diseases.
✔️ Leaf cuttings shouldn’t be too small or too large; medium-sized leaves from the second or third row of growth on a plant often work best.
✔️ If the plant has variegated leaves, choose leaves with more green portions, as these contain more chlorophyll, which aids in root formation.
Once you’ve selected the right cutting, it’s time for preparation for rooting.

Preparing Your Cutting for Rooting
- Use Sterilized Tools: Always use a sharp, sterilized knife or pruning shears for clean cuts to avoid introducing infections.
- Make a Diagonal Cut: Make a diagonal cut at the base of the leaf stem (petiole). This increases the surface area available for root growth.
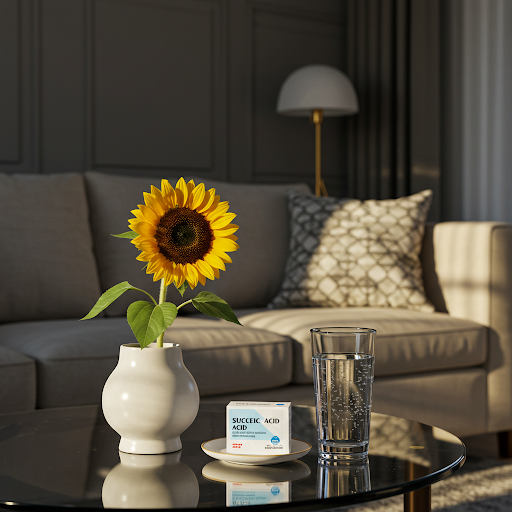
- Use a Rooting Stimulant: To enhance root formation, we’ll prepare a solution using succinic acid tablets, readily available at most pharmacies or health stores.
Speeding Up Root Formation with Succinic Acid
Succinic acid is a natural plant growth regulator that can improve root development and help cuttings cope with stress. Here’s how to use it:
- Dissolve half a tablet of succinic acid in one cup of water (approximately 200 ml).
- Stir well until the tablet is completely dissolved.
- Soak your cuttings in this solution for 12 hours. This treatment will help stimulate root growth and increase the chances of successful propagation.
After 12 hours, remove the leaf cuttings from the solution and allow them to air dry for about 20 minutes before planting. This drying period helps prevent rot at the cut site.
Preparing the Best Soil for Rooting Cuttings
For successful rooting, the substrate needs to be:
✔️ Loose: Allowing roots to develop easily.
✔️ Moisture-Retentive: Holding enough moisture without becoming waterlogged.
✔️ Well-Aerated: Preventing root rot by allowing oxygen to reach the roots.
The Ideal Soil Mix for Rooting Cuttings:
- 🌱 3 parts potting soil or peat moss: Provides organic material and nutrients.
- 🌱 1 part perlite: Improves aeration and drainage.
- 🌱 1 part vermiculite: Helps retain moisture and prevents soil compaction.
Once your soil mix is ready, fill a small cup or container with it, pressing it down gently.
Sterilizing the Soil to Prevent Infections
To protect your young cuttings from fungal infections and harmful bacteria, it’s essential to sterilize the soil before planting. Here are two simple methods:
- ✔️ Using a Fungicide: If available, treat the soil with a biological fungicide to eliminate harmful microorganisms.
- ✔️ Using Potassium Permanganate (Manganese Solution): If you don’t have a fungicide, mix a saturated pink solution of potassium permanganate (available at some pharmacies or online) and pour it over the soil. Let it sit for 15 minutes before planting. Note: Use potassium permanganate with caution and follow safety guidelines. A fungicide is generally a safer and more readily available option for most home gardeners in the US.
Planting Your Cutting Correctly
Now that your soil is prepared and treated, it’s time to plant your cutting:
- Make a small hole in the soil: Deep enough to hold the cut stem securely.
- Insert the cutting: Ensure the leaf itself is not touching the soil to prevent rot.
- Gently firm the soil: Lightly press the soil around the base of the cutting to provide stability.
- Water lightly: If the soil seems very dry, gently moisten it. However, avoid overwatering, as excess moisture can lead to rot.
Create a Mini-Greenhouse for Faster Rooting
To maintain humidity and create an optimal environment for root formation, cover the pot with a clear plastic bag or place it in a mini-greenhouse.
🌿 Place the cutting in a bright, warm location: Ideally, the temperature should be around 68-77°F (20-25°C). Avoid direct sunlight, which can scorch the cutting.
🌿 Ventilate daily: Open the plastic bag for a few minutes each day to prevent mold buildup.
🌿 Check moisture levels: If the soil starts to dry out, mist it lightly with water.
Monitoring Root Growth and Transplanting
After 7-10 days, you should start to see the formation of the first small roots. In about 3-4 weeks, small plantlets (called “pups” in African Violets) will begin to emerge at the base of the leaf cutting.
Once the new plantlets are large enough (around 2 inches or 5 cm in size), carefully separate them from the mother leaf and transplant them into individual pots filled with a nutrient-rich potting mix.
Final Tips for Successful Rooting
✔️ Always use healthy leaves: Weak or damaged leaves will struggle to root.
✔️ Don’t overwater: Keep the soil consistently moist but not waterlogged to prevent root rot.
✔️ Maintain humidity: Rooting thrives in a humid environment, so cover your cuttings, but ensure regular ventilation.
✔️ Use a rooting stimulant: Succinic acid, aloe vera juice, or even honey can help promote faster root development.
✔️ Be patient! Some plants take longer to root than others, but with proper care, success is usually guaranteed.
Conclusion
Rooting cuttings is a simple and rewarding way to propagate your favorite plants. By using this easy succinic acid method, you can significantly increase your chances of successful root formation. With the right cutting, soil mix, and humidity control, you can enjoy healthy new plants in just a few weeks!
If you found this guide helpful, try this method and watch your cuttings flourish! Happy gardening!
About the Author — Greenship Garden Team
Greenship Garden is a U.S.-based brand dedicated to modern planter design and home gardening inspiration.
Our editorial team combines years of experience in plant care, garden styling, and sustainable living to help plant lovers create their perfect green spaces.
Through this blog, we share practical gardening tips, planter styling guides, and insights on how to choose the right pots for every home.
🌿 Written and reviewed by the Greenship Garden Team.