I Was Shocked! It Showed Results! I Stuck a Cutting in Aloe Vera, and It All Rooted!
Rooting plant cuttings can sometimes feel like a gamble, especially when dealing with issues like rot and slow root development. However, there’s a natural and potentially effective method that can make this process easier and more successful – using aloe vera. Aloe vera is a remarkable plant packed with bioactive substances that may stimulate root growth while also helping to prevent bacterial and fungal infections. In this guide, I’ll walk you through the entire process, from preparing your cutting to using an aloe vera leaf to witness successful root formation. I was genuinely surprised by the results when I tried this, and I’m excited to share it with you!
Why Use Aloe Vera for Rooting Cuttings?
Aloe vera contains natural growth hormones, enzymes, and antimicrobial properties that may make it an excellent rooting aid. When a cutting is placed inside an aloe vera leaf, it may benefit from:
- Growth Stimulation: Aloe vera is said to contain auxins, which are natural plant hormones that promote root development.
- Protection Against Rot: Its antifungal and antibacterial compounds may help prevent the cutting from rotting.
- Moisture and Nourishment: The aloe vera juice provides moisture and potentially some nutrients, enhancing the cutting’s chances of survival.
This method might be particularly useful for delicate cuttings that are prone to rotting, such as roses, geraniums, and other ornamental plants.
Step-by-Step Guide to Rooting Cuttings with Aloe Vera
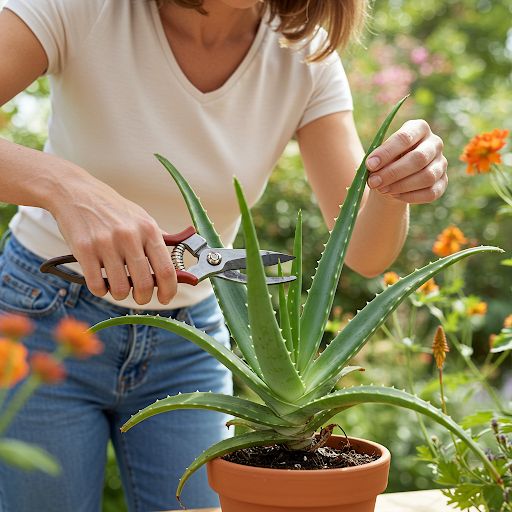
Step 1: Select and Prepare Your Cutting
- Choose a healthy plant and identify a stem that is about 3-4 inches (8-10 cm) long. This is often considered an ideal size for successful rooting.
- Using clean, sharp scissors or pruning shears, make a clean cut at an angle on your chosen stem.
- Remove the lower leaves, leaving only 2-3 leaves at the top. This reduces moisture loss and prevents the plant from wasting energy on maintaining excess foliage.
- If your cutting has any flower buds, pinch them off to direct the plant’s energy towards root formation rather than flowering.
- Allow the cutting to air dry for about 20-30 minutes. This helps the cut end to callous over slightly, which can reduce the chance of rot.
Step 2: Prepare the Aloe Vera Leaf
- Select a fresh, healthy aloe vera leaf from a mature plant.
- Cut a section of the leaf that is an appropriate size for your cutting. Ideally, it should be at least 2 inches (5 cm) longer than the base of your cutting.
- Using a knife, carefully slice the aloe vera leaf slightly open, creating a pocket or space where you can insert your cutting. If possible, try to keep one side of the leaf mostly intact.
- Insert your cutting into the aloe vera leaf, ensuring that at least 1-2 inches (3-5 cm) of the stem are inside the leaf. The cutting should be surrounded by the aloe vera gel, which will hopefully nourish and protect it.
Step 3: Plant the Cutting
- Prepare a light, well-draining soil mix. A mixture of peat moss and perlite is often recommended for rooting cuttings.
- To help prevent infection, you can sterilize your soil by heating it in the oven or treating it with a biological agent like Trichoderma.
- Place the aloe vera leaf (with the cutting inside) into your soil, ensuring that the cut side of the aloe vera leaf is positioned upright.
- Gently firm the soil around the aloe vera leaf to hold it in place.
- Water lightly, just enough to moisten the soil without making it soggy.
Step 4: Create a Humid Environment
- Create a mini-greenhouse by covering the pot with a plastic bag or a clear container. This traps moisture and maintains high humidity, which is crucial for root development.
- Place the plant in a location with bright but indirect light, such as a windowsill that doesn’t receive direct sun.
- Avoid opening the cover for the first 2-3 weeks. Maintaining high humidity is key to preventing dehydration.
Step 5: Observe the Results
After approximately 21 days, check your cutting:
- The aloe vera leaf will likely dry out and start to decompose, but this is normal.
- The cutting should have developed a strong root system, thanks to the potential nutrients and growth stimulants from the aloe vera gel.
- The stem should remain firm, indicating that it has successfully absorbed beneficial compounds from the aloe.
Additional Tips for Success:
- If you live in a very dry climate, you might occasionally mist the inside of the plastic covering to maintain humidity.
- Once roots have developed, gradually acclimate the plant to open air by removing the plastic bag for a few hours each day.
- After about a month, transplant your rooted cutting into a larger pot with regular potting soil.
What Types of Plants Can Be Rooted This Way?
According to the Spanish article, this method may be particularly effective for:
- Roses
- Geraniums (Pelargoniums)
- Jade Plants (Crassula ovata)
- Pothos (Epipremnum aureum)
- Hoyas
- Fiddle Leaf Figs (Ficus lyrata)
- Other soft-stemmed houseplants
Final Thoughts:
Using aloe vera as a natural rooting hormone is presented as a simple and potentially powerful method for plant propagation. It harnesses the natural properties of aloe vera to encourage strong root growth while also helping to prevent common issues like rot and infection. This method is described as being entirely organic, cost-effective, and potentially very successful. If you’ve struggled with rooting cuttings in the past, give this technique a try – you might be as surprised as I was by the results!
Important Considerations for US Gardeners:
While the Spanish article highlights this method, it’s important to note that scientific evidence specifically validating the effectiveness of using an aloe vera leaf as a rooting medium might be limited. However, aloe vera gel itself is often used by gardeners for its potential rooting hormone properties.
You can also try dipping the cut end of your cutting directly into pure aloe vera gel before planting it in your preferred rooting medium (like soil, perlite, or vermiculite). This is a more common approach in the US gardening community.
Regardless of the method you choose, ensure you are providing the cutting with the right conditions (light, humidity, and appropriate rooting medium) for successful propagation.
About the Author — Greenship Garden Team
Greenship Garden is a U.S.-based brand dedicated to modern planter design and home gardening inspiration.
Our editorial team combines years of experience in plant care, garden styling, and sustainable living to help plant lovers create their perfect green spaces.
Through this blog, we share practical gardening tips, planter styling guides, and insights on how to choose the right pots for every home.
🌿 Written and reviewed by the Greenship Garden Team.