Grow a Mountain of Bottle Gourds in Plastic Bottles at Home: Tips for a Huge Harvest
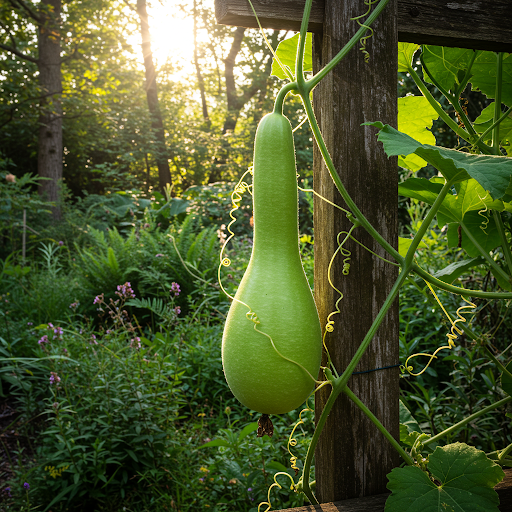
Growing organic bottle gourds (Lagenaria siceraria) at home using plastic bottles is an innovative, space-saving, and sustainable gardening method. This approach is perfect for urban gardeners, apartment dwellers, or anyone looking to maximize small spaces. Bottle gourds are fast-growing vines that thrive in warm conditions, and with the right techniques, you can cultivate a surprising amount of fresh gourds even without a traditional garden. In this guide, we’ll explore the step-by-step tips on how to grow organic bottle gourds in plastic bottles and ensure a plentiful harvest.
Why Grow Bottle Gourds in Plastic Bottles?
Using plastic bottles as planters offers several advantages:
- Space-Saving: Ideal for balconies, patios, and small home gardens.
- Recycling: Helps reduce plastic waste by repurposing old bottles.
- Cost-Effective: Eliminates the need for expensive pots or containers.
- Controlled Environment: Easier to manage soil quality, moisture, and pest control.
- Portable: Allows for easy relocation to optimize sunlight exposure.
With proper care, bottle gourds can thrive in this environment and produce multiple fruits throughout their growing season.
Choosing the Right Plastic Bottles
First, select large plastic bottles (preferably 1.5 gallons or larger) to provide ample space for root growth. Water bottles, juice containers, or oil jugs work well. Clear bottles should be wrapped in dark fabric or painted to protect the roots from excessive sunlight.
Steps to Prepare Plastic Bottles for Planting
- Cutting and Preparing the Bottles: Cut the bottles horizontally, leaving the top open for planting while keeping the base intact to hold the soil.
- Creating Drainage Holes: Drill or poke several small holes in the bottom to prevent waterlogging.
- Layering the Bottom: Add a thin layer of gravel or pebbles at the bottom for improved drainage.
- Filling with Nutrient-Rich Soil: Use an organic potting mix amended with compost or well-rotted manure to enhance fertility.
Selecting the Right Varieties
Choose bottle gourd varieties that are well-suited for container gardening. Common varieties available in the US include:
- Round Bottle Gourd: Produces spherical gourds, suitable for smaller spaces.
- Long Bottle Gourd: Requires a sturdy trellis to support the long vines.
- Hybrid Varieties: Often more resistant to pests and diseases, ensuring a higher yield. Look for varieties specifically mentioned as good for containers.
How to Grow Bottle Gourds from Seeds
1. Seed Selection and Germination
- Choose high-quality, organic bottle gourd seeds.
- Soak the seeds in lukewarm water for 8-12 hours to speed up germination.
- Sow the seeds about 1 inch deep in your prepared plastic bottle planters.
- Keep the soil consistently moist but not waterlogged, and place the containers in a warm, sunny location.
- Seeds typically germinate within 7-10 days.

2. Providing the Right Growing Conditions
- Sunlight: Bottle gourds need at least 6-8 hours of direct sunlight per day. Place your containers in a sunny area like a balcony, patio, or a south-facing window.
- Watering: Maintain consistent moisture but avoid overwatering. Water the plants in the early morning or late evening to reduce evaporation. Consider using a self-watering system by placing a small reservoir of water beneath the container.
- Soil and Fertilization: Use a nutrient-rich, well-draining soil mix amended with compost, coco coir, and garden soil. Fertilize every two weeks with an organic fertilizer such as well-rotted cow manure, vermicompost, or banana peel tea to promote growth. A monthly application of diluted Epsom salt (magnesium sulfate) can also enhance chlorophyll production and strengthen the plant.
3. Training and Supporting the Vines
Since bottle gourds are climbing plants, they require strong support:
- Use a trellis, bamboo stakes, or netting to support the vines.
- Train the vines upwards to maximize space and improve air circulation.
- Regularly tie the stems to the support system to prevent breakage.
4. Pruning for Better Yield
- Prune weak or overcrowded vines to encourage better airflow and fruit development.
- Remove any dried leaves and excess shoots to direct more energy towards fruiting.
- When the plant reaches about 6-8 feet, pinch off the growing tips to encourage branching and more fruit production.
5. Pollination – Ensuring More Fruits
Bottle gourd plants produce both male and female flowers. Hand-pollination increases fruit set, especially when natural pollinators are scarce.
- Identify the Flowers: Male flowers have thin stems, while female flowers have a small, immature gourd-like structure at the base.
- Pollinate: Use a soft brush or cotton swab to transfer pollen from the male flower to the female flower.
- Timing: Pollinate in the early morning for best results.
6. Pest and Disease Management
Organic gardening means avoiding chemical pesticides. Use natural methods to control common pests:
- Aphids and Whiteflies: Spray with neem oil or garlic water every 7-10 days.
- Fungal Diseases: Avoid overhead watering and ensure good air circulation.
- Powdery Mildew: Use a baking soda and water spray to prevent fungal growth.
7. Harvesting Bottle Gourds
Bottle gourds are typically ready for harvest 60-90 days after planting. Signs of a mature gourd include:
- Firm texture and uniform green color.
- Absence of prominent wrinkles or yellowing.
- Slightly glossy skin.
Cut the fruit with sharp scissors or pruning shears, leaving a short stem attached. Frequent harvesting encourages the plant to produce more gourds.
Additional Tips for Continuous Harvesting
- Replenish Soil Nutrients: After each harvest, add compost or organic fertilizer to keep the plant healthy.
- Mulching: Use dried leaves or straw to retain soil moisture and suppress weed growth.
- Protect from Harsh Weather: Provide shade or cover the plants with a lightweight cloth during extreme heat or heavy rain.
Conclusion
Growing organic bottle gourds in plastic bottles is a rewarding and eco-friendly way to enjoy fresh vegetables at home. With proper care, regular pruning, and a little effort, you can cultivate a thriving plant that yields multiple gourds throughout the season. By following these smart and sustainable gardening techniques, even those with limited space can enjoy a bountiful harvest of this nutritious and versatile vegetable. Start your bottle gourd journey today and experience the joy of homegrown produce!
k2-21G
By greenship|2024-08-13T06:17:26+00:00August 13, 2024|Categories: Hand-carving Series|
20YB
By greenship|2024-08-16T05:37:57+00:00August 16, 2024|Categories: Hand-carving Series|
Planter 6 in W / 8 in W / 12 in W Indoor or Outdoor Plants, Modern Decorative Plant Pots with Drainage Hole, Decorative Flower Pots
By greenship-seo|2025-02-06T13:43:53+00:00January 16, 2025|Categories: Hand-carving Series|Tags: Decorative Flower Pots|
KC3-14A
By greenship|2024-08-16T06:26:30+00:00August 16, 2024|Categories: Hand-carving Series|
K2-11T
By greenship|2024-08-13T04:21:25+00:00August 13, 2024|Categories: Hand-carving Series|
Modern Plant Pots with Drainage – Indoor & Outdoor Use (6″ Widths)
By greenship-seo|2025-04-10T06:29:43+00:00February 6, 2025|Categories: Hand-carving Series|Tags: Decorative Flower Pots|

