The Secret to Rooting Cuttings in No Time: Propagating Geraniums Made Easy
Geraniums are among the most beloved and easiest flowering plants to grow. They bring beauty and color to gardens, balconies, and indoor spaces alike. One of the best things about geraniums is how readily they can be propagated from cuttings. If you’re looking to expand your geranium collection quickly and successfully, knowing the secrets to rooting cuttings in a short amount of time is key. In this article, we’ll explore the best methods, tips, and tricks to ensure rapid and healthy root development.
Why Propagate Geraniums from Cuttings?
Propagating geraniums from cuttings is a cost-effective and straightforward way to increase your plant collection. Unlike growing from seeds, which can take longer and may not produce plants identical to the parent, cuttings provide genetically identical clones. This method ensures your new plants inherit the exact characteristics of the mother plant, including flower color, growth habits, and disease resistance.
The Best Time to Take Geranium Cuttings
The ideal time to take geranium cuttings is during their active growth season – spring and summer. At this time, the plant is producing new growth, which tends to root more readily. However, if you have a warm indoor environment with sufficient light, you can propagate geraniums year-round.
A Step-by-Step Guide to Propagating Geraniums from Cuttings
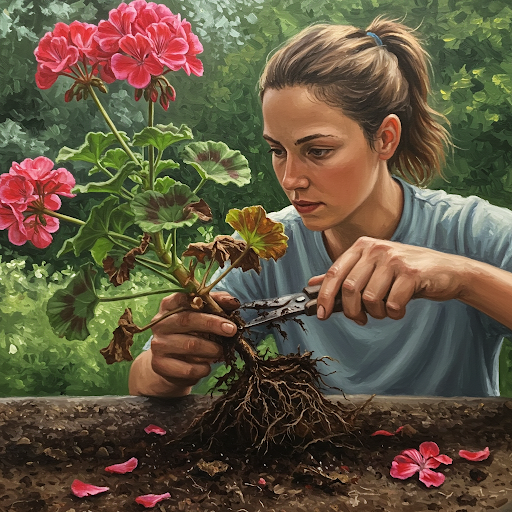
1. Select the Right Cutting:
- Choose a healthy, mature geranium plant that is free from pests and diseases.
- Look for stems that are not currently flowering, as they will focus their energy on root development rather than blooming.
- Using sharp, sterilized scissors or pruning shears, cut a 4-6 inch (10-15 cm) stem just below a node (the point where leaves emerge).
- Ensure the cutting has at least 3-4 sets of leaves.
2. Prepare the Cutting:
- Remove the lower sets of leaves, leaving only a few leaves at the top.
- If there are any buds or flowers present, remove them to prevent energy diversion.
- Allow the cutting to sit in a dry, shaded place for a few hours to allow the cut end to callous over. This helps prevent rot when planting.
3. Use Rooting Hormone (Optional but Recommended):
- While geraniums root fairly easily, dipping the cut end into a rooting hormone can speed up the process and increase the success rate.
- For a natural alternative, cinnamon powder or honey can act as organic rooting stimulants.
4. Choose the Right Planting Medium:
- Use a well-draining, lightweight soil mix. A combination of peat moss, perlite, and sand works well. You can also use a commercial seed-starting mix.
- Avoid using heavy garden soil, as it can retain too much moisture and potentially lead to rot.
- Fill a small pot or seed tray with your chosen medium and water it lightly.
5. Plant the Cutting:
- Use a pencil or stick to make a small hole in the soil.
- Insert the cutting about 1-2 inches (2.5-5 cm) deep.
- Gently firm the soil around the base to provide stability.

6. Create Ideal Growing Conditions:
- Place the pot in a bright, warm location with indirect sunlight. Direct sunlight can be too harsh for new cuttings.
- Maintain a temperature between 65-75°F (18-24°C) for optimal rooting.
- Cover the pot with a clear plastic bag or a propagation dome to maintain high humidity, but ensure there is some ventilation to prevent mold growth. You can achieve ventilation by poking a few holes in the bag or slightly opening the dome.
7. Watering and Care:
- Water the cutting sparingly, keeping the soil slightly moist but not waterlogged.
- Avoid overwatering, as excessive moisture can lead to rot.
- If the leaves appear wilted, lightly mist them to maintain humidity.
How Long Does it Take for Geranium Cuttings to Root?
Roots typically begin to form within 7-14 days, but some cuttings may take up to 4 weeks. You can check for root development by gently tugging on the cutting – if you feel resistance, roots have likely developed.
Transplanting Rooted Cuttings:
Once your cutting has established a strong root system, it’s ready to be transplanted into a larger pot or directly into the garden. Follow these steps:
- Choose a pot with drainage holes or prepare a well-draining garden bed.
- Fill it with nutrient-rich, well-draining soil.
- Carefully remove the cutting from its propagation pot and plant it at the same depth it was previously growing.
- Water gently and place in a location with appropriate sunlight for geraniums (typically full sun).
Common Problems and Solutions:
- Cutting Wilting or Rotting:
- Cause: Overwatering or high humidity without air circulation.
- Solution: Reduce watering and provide ventilation.
- No Root Development After Several Weeks:
- Cause: Too much light, too little moisture, or an unhealthy cutting.
- Solution: Move to a slightly shadier spot, ensure consistent moisture, and start with a healthy cutting.
- Yellowing Leaves:
- Cause: Overwatering, nutrient deficiency, or transplant shock.
- Solution: Allow the soil to dry out slightly, consider a very diluted fertilizer once roots have formed, and avoid sudden changes in environment.
Final Tips for Successful Geranium Propagation:
- Always use sterilized tools to prevent the spread of disease.
- Rotate your plants every few days to ensure even growth.
- Once roots are established, fertilize sparingly to encourage robust development.
- Pinch back new growth to promote bushier plants and more flowers down the line.
By following these simple steps, you can successfully root geranium cuttings in no time and enjoy an abundance of healthy, blooming plants in your home or garden. Happy gardening!
About the Author — Greenship Garden Team
Greenship Garden is a U.S.-based brand dedicated to modern planter design and home gardening inspiration.
Our editorial team combines years of experience in plant care, garden styling, and sustainable living to help plant lovers create their perfect green spaces.
Through this blog, we share practical gardening tips, planter styling guides, and insights on how to choose the right pots for every home.
🌿 Written and reviewed by the Greenship Garden Team.