How Do You Make a Self-Watering System for Plants? Simple DIY Solutions
Keeping your plants adequately watered can sometimes feel like a chore, especially if you have a busy lifestyle or are planning a vacation. Fortunately, you don’t need to buy expensive self-watering planters to ensure your green friends stay hydrated. Creating your own DIY self-watering system is easy, affordable, and can be tailored to your specific plant needs. Here are several simple methods you can try:
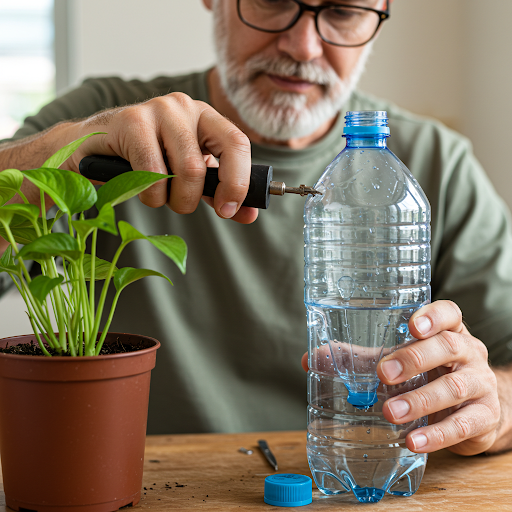
1. The Plastic Bottle Watering Spike
This is one of the easiest and most common DIY self-watering methods, perfect for individual potted plants.
Materials:
- Empty plastic water or soda bottle (various sizes work)
- Small nail or skewer
Instructions:
- Poke Holes in the Cap: Using the nail or skewer, poke several small holes in the bottle cap. These holes will allow water to slowly seep out.
- Cut the Bottom (Optional): For easier filling, you can cut off the bottom of the bottle. Alternatively, you can fill it from the top before inverting.
- Fill the Bottle with Water: Fill the bottle completely with water.
- Invert and Insert: Screw the cap back on tightly. Carefully invert the bottle and push it, cap-first, into the soil near the center of your plant’s pot. Ensure the bottle is stable.
- Monitor: The water will slowly release into the soil as it dries out. Refill the bottle when empty.
2. The Wicking System
This method is great for plants that like consistent moisture and can be used for individual pots or a group of plants.
Materials:
- Container for water (bucket, bowl, jar)
- Absorbent wick material (cotton rope, thick yarn – not synthetic, strips of old cotton t-shirt)
- Your potted plant(s)
Instructions:
- Prepare the Wick: Cut a length of wick long enough to reach the bottom of your water container and several inches into the soil of your plant.
- Place One End in the Soil: Gently create a hole in the soil near the base of your plant and insert one end of the wick a few inches deep. Cover it with soil to keep it in place.
- Place the Other End in Water: Place the other end of the wick in your container of water. Ensure the water container is positioned slightly lower than or at the same level as the plant for proper wicking action.
- Water Initially: Water your plant thoroughly from the top initially to start the wicking process.
- Monitor: The wick will draw water from the container to the soil as needed. Refill the water container regularly.
3. The Upside-Down Bottle Method
This method is similar to the watering spike but uses a bottle without holes in the cap.
Materials:
- Empty glass or plastic bottle with a narrow neck (wine bottles work well)
- Water
Instructions:
- Fill the Bottle: Fill the bottle completely with water.
- Carefully Invert: Carefully invert the bottle and quickly push the open neck into the soil of your plant. Make sure the bottle is inserted deep enough to stay upright.
- Soil Seal: The soil will create a seal at the bottle’s opening, preventing all the water from rushing out at once. As the soil dries, air will enter the bottle, releasing more water.
- Monitor: Refill the bottle when empty by carefully lifting it out and repeating the process.
4. The Mason Jar Watering System
This is a neat and aesthetically pleasing option for smaller plants.
Materials:
- Mason jar with a lid
- Nail and hammer or drill
- Water
Instructions:
- Make Holes in the Lid: Using the nail and hammer or a drill, create several small holes in the mason jar lid.
- Fill the Jar with Water: Fill the mason jar with water.
- Secure the Lid and Invert: Screw the lid tightly onto the jar. Carefully invert the jar and push the lid into the soil of your plant.
- Monitor: The water will slowly seep out through the holes in the lid as the soil dries. Refill the jar when needed.

Tips for Success:
- Test Your System: Before relying on your DIY system for an extended period, test it for a few days to ensure the watering rate is appropriate for your plant.
- Consider Your Plant Type: Different plants have different watering needs. Adjust the number and size of holes or the thickness of your wick accordingly. Plants that prefer drier conditions will need fewer or smaller holes/thinner wicks.
- Use Clean Water: Always use clean water in your self-watering systems to prevent the growth of bacteria or mold.
- Monitor Soil Moisture: Even with a self-watering system, occasionally check the soil moisture with your finger to ensure your plant is getting the right amount of water.
Creating your own self-watering system is a rewarding way to care for your plants efficiently and affordably. Experiment with these methods to find what works best for your green companions and enjoy the convenience of worry-free watering!
About the Author — Greenship Garden Team
Greenship Garden is a U.S.-based brand dedicated to modern planter design and home gardening inspiration.
Our editorial team combines years of experience in plant care, garden styling, and sustainable living to help plant lovers create their perfect green spaces.
Through this blog, we share practical gardening tips, planter styling guides, and insights on how to choose the right pots for every home.
🌿 Written and reviewed by the Greenship Garden Team.