What are the Key Steps to Pay Attention to When Making a DIY Planter Box? A Beginner’s Guide
Building your own planter box can be a rewarding DIY project, allowing you to customize the size, style, and material to perfectly suit your gardening needs and outdoor space. While the process can be straightforward, paying attention to certain key steps will ensure a sturdy, long-lasting planter that will help your plants thrive. Here’s a breakdown of the essential steps to consider when making a DIY planter box.
Step 1: Planning and Design – Measure Twice, Cut Once
Before you even pick up a saw, take the time to plan your planter box.
- Determine the Size: Consider the space where the planter will go and the types of plants you intend to grow. Larger plants with extensive root systems will need bigger and deeper boxes. Think about the dimensions (length, width, and depth) that will best fit your needs.
- Choose a Shape: Rectangular and square boxes are the most common and easiest to build, but you can get creative with other shapes if you have the skills and tools.
- Sketch it Out: A simple drawing or sketch with dimensions will help you visualize the final product and create an accurate cut list.
Step 2: Selecting Your Materials – Choosing the Right Foundation
The material you choose will significantly impact the planter’s durability and longevity. Wood is the most popular choice for DIY planter boxes.
- Wood Type:
- Cedar and Redwood: These are naturally rot-resistant and are excellent choices for outdoor use, though they can be more expensive.
- Pressure-Treated Lumber: A more budget-friendly option that is treated to resist decay and insects. However, some gardeners prefer to avoid it when growing edibles due to potential chemical leaching. Consider using a liner if you choose treated wood for vegetable gardens.
- Untreated Lumber (Pine, Fir): More affordable but will require sealing or painting to protect it from the elements and prolong its life.
- Fasteners: Use exterior-grade screws that are resistant to rust and corrosion. The length will depend on the thickness of your wood.
Step 3: Cutting the Materials – Precision is Key
Accurate cuts are essential for a well-built planter box.
- Create a Cut List: Based on your plan, list all the pieces of wood you’ll need and their exact dimensions.
- Measure Carefully: Double-check all your measurements before making any cuts.
- Use the Right Tools: A circular saw, hand saw, or miter saw can be used to cut the wood. Ensure your saw blade is sharp for clean cuts.
- Sand the Edges: Sanding down any rough edges or splinters will not only improve the appearance but also make the planter safer to handle.
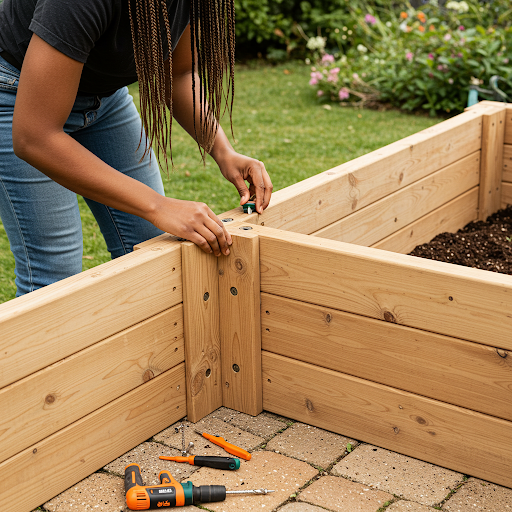
Step 4: Assembling the Box – Putting it All Together
Securely joining the pieces is crucial for a sturdy planter box.
- Pre-Drill Holes: Drilling pilot holes before inserting screws will help prevent the wood from splitting, especially near the edges.
- Use Wood Glue: Applying exterior-grade wood glue to the joints before screwing them together will add extra strength and water resistance.
- Ensure Square Corners: Use a carpenter’s square to ensure that the corners of your planter box are at a 90-degree angle. This will give your planter a professional look and ensure it sits evenly.
Step 5: Ensuring Proper Drainage – Happy Roots Need Air
Adequate drainage is vital for the health of your plants.
- Drill Drainage Holes: Drill several drainage holes (at least ½ inch in diameter) in the bottom of the planter box. The number of holes will depend on the size of the planter. For larger boxes, consider adding holes along the sides near the bottom as well.
- Consider a Drainage Layer (Optional): Some gardeners add a layer of gravel or landscape fabric at the bottom of the planter before adding soil to further improve drainage. However, modern gardening advice often suggests that simply ensuring drainage holes and using a good quality potting mix is sufficient.

Step 6: Lining the Planter Box (Optional but Recommended) – Protecting Your Investment
Lining the inside of your wooden planter box can significantly extend its lifespan.
- Use Landscape Fabric or Plastic Sheeting: Line the interior of the planter with landscape fabric or thick plastic sheeting (make sure to puncture holes for drainage). This will help to prevent the wood from coming into direct contact with moist soil, which can lead to rot.
Step 7: Finishing the Planter Box (Optional) – Adding Style and Protection
Finishing your planter box can enhance its appearance and provide additional protection.
- Painting or Staining: Use exterior-grade paint or stain to add color and protect the wood from the elements. Make sure the finish is non-toxic if you plan to grow edibles.
- Sealing: Applying a sealant can help to further protect the wood from moisture damage.
Step 8: Choosing the Right Location – Sunlight and Accessibility
Once your planter box is built, consider its placement carefully.
- Sunlight Requirements: Choose a location that provides the appropriate amount of sunlight for the plants you intend to grow.
- Accessibility: Ensure the planter box is in a location where you can easily access it for watering, weeding, and harvesting.
- Level Surface: Place the planter box on a level surface to prevent it from tipping over.
By paying attention to these key steps, you can confidently build a durable and attractive DIY planter box that will provide a wonderful home for your plants for years to come.
About the Author — Greenship Garden Team
Greenship Garden is a U.S.-based brand dedicated to modern planter design and home gardening inspiration.
Our editorial team combines years of experience in plant care, garden styling, and sustainable living to help plant lovers create their perfect green spaces.
Through this blog, we share practical gardening tips, planter styling guides, and insights on how to choose the right pots for every home.
🌿 Written and reviewed by the Greenship Garden Team.